Interfacing DHT22 sensor

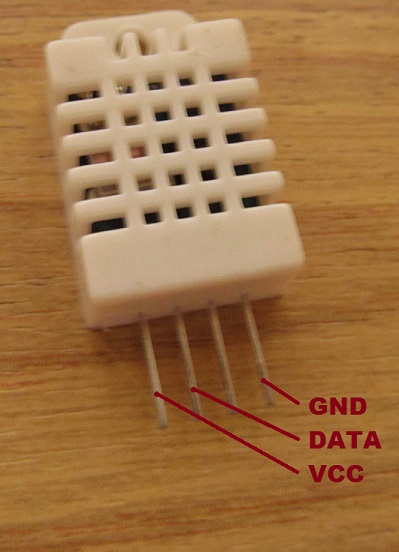
The DHT22 (also known as AM2302) is a cheap temperature and humidity sensor with an impressive performance! It uses a capacitive humidity sensor and a thermistor to measure the air, and send out a digital signal on the data pin (no analog input pins needed). Its fairly simple to use, but requires careful timing to grab data. The only real CON of this sensor is that you can only get new data from it once every 2 seconds. It is provided with a single wire digital interface. The sensor is calibrated and only requires a single pull-up resistor (any value between 3.6k and 10k should work fine) on the dataline to communicate correctly. Compared to the cheaper (and wider diffused) DHT11, this module is much more precise, more accurate and works in a bigger range of temperature/humidity.

dht22_pinout

Continue reading

Simple power supply for large breadboards

Most breadboards are not equipped with a power supply circuit. Every electronic enthusiast uses a breadboard since they are a fundamental tool to develop in a fast and easy way. Some problems arise when we need to work with devices not powered from the USB port or that need other supply voltages than 5V, so I decided to add a simple power supply to my large breadboard.

bbsupply_main

Continue reading

SM130 RFID with Arduino MEGA

Radio-frequency identification (RFID) is the wireless non-contact use of radio-frequency electromagnetic fields to transfer data, for the purposes of automatically identifying and tracking tags attached to objects. The tags contain electronically stored information. Some tags are powered by and read at short ranges (a few meters) via magnetic fields (electromagnetic induction). Others use a local power source such as a battery, or else have no battery but collect energy from the interrogating EM field, and then act as a passive transponder to emit microwaves or UHF radio waves (i.e., electromagnetic radiation at high frequencies). Battery powered tags may operate at hundreds of meters. Unlike a bar code, the tag does not necessarily need to be within line of sight of the reader, and may be embedded in the tracked object.

Continue reading

2SC5200 & 2SA1943 output power stage

Every audio amplifier is made basically of three blocks, each one with different purposes:

  1. Voltage Amplifier – it receives the input signal with high impedance (tipically 47kohm) and amplifies it so that can drive the driver stage
  2. Driver Stage – is places between Voltage Amplifier and Output Stage and adapt and sometime “processes” the signal so that can drive the output stage
  3. Output Stage – is the final block in charge of deliver high currents, so that the amplifier can handle low-resistance loads such as a speaker

out_pwr_st_diag

The project that I’m about to present is an output power stage, capable to handle more than 500w if mounted on a suitable heatsink.

Continue reading

LM3886 Gainclone Boosted!

Gainclone or chipamp is a term commonly used to describe a type of audio amplifier made by do-it-yourselfers, or individuals interested in DIY audio. It is a design based on high-power integrated circuits, particularly the National Semiconductor Overture series. The Gainclone is probably the most commonly built and well-known amplifier project amongst hobbyists. It is simple to build and involves only a few readily accessible, inexpensive parts. As an amplifier it is highly regarded by many in the DIY community. (from wikipedia http://en.wikipedia.org/wiki/Gainclone)

No one can describe the gainclone’s philosophy better than this wikipedia page!

Tha gainclone is an easy-to-built, cheap, hifi quality, simple amplifier made with few components. I’ve decided to create a gainclone version myself, doubling the output power and using the idea from an old application note from National Semiconductor, talking about the parallel amplifier PA100.

Continue reading